R in HPC Miniconda
Apart from a centralized installation of R, we also have a Miniconda installation of R (ver=3.6.1) as part of the Miniconda module in the HPC. This provides greater flexibility and easier installation for other complementary packages required for R (eg: Tidyverse, Rstan etc). To find more details on the Miniconda module usage, click here.
Tip
If you have never used Conda, we recommend you to use the HPC Miniconda. You can find the steps to set up the HPC Miniconda by clicking here.
Note
The conda cheat sheet gives you a list of useful commands in a glance: Conda-cheat-sheet
How to clone the R environment
- If you are using the HPC Miniconda
This creates an exclusive local environment (installation) of the R package in the given path (in the example below, the path is “/home/wz22/.conda/envs/R”). The User can now activate this environment and use it and further install any required complementary packages in the activated environment (More details on this in upcoming sections).
#conda create -p /home/<NetID>/.conda/envs/R --clone r_env

#or

#conda create -n <name of the new env> --clone <existing env>

#example:
conda create -p /home/wz22/.conda/envs/R --clone r_env

#or

conda create -n R --clone r_env
A sample output is shown below:
[wz22@login1 ~]$ conda create -p /home/wz22/.conda/envs/R --clone r_env
Source:      /share/apps/NYUAD5/miniconda/3-4.11.0/envs/r_env
Destination: /home/wz22/.conda/envs/R
Packages: 257
Files: 4684

Downloading and Extracting Packages

Preparing transaction: done
Verifying transaction: done
Executing transaction: done
#
# To activate this environment, use
#
#     $ conda activate /home/wz22/.conda/envs/R
#
# To deactivate an active environment, use
#
#     $ conda deactivate

[wz22@login1 ~]$
Note
It must be noted that the given path is not the path to the working directory, but the location where the user wishes to install the environment. The user can navigate to any directory (where his application and running script resides) and activate the required environment.
If you are using your own conda package
#conda create -p /home/<NetID>/.conda/envs/R --clone <path-to-existing-env>

#or

#conda create -n <name of the new env> --clone <path to existing env>

#example:

conda create -p /home/wz22/.conda/envs/R --clone /share/apps/NYUAD/miniconda/3-4.8.2/envs/r_env

#or

conda create -n R --clone /share/apps/NYUAD/miniconda/3-4.8.2/envs/r_env
Finding the Conda complementary packages (Tidyverse, Rstan etc)
- Search on the web for the Conda package of the required library.
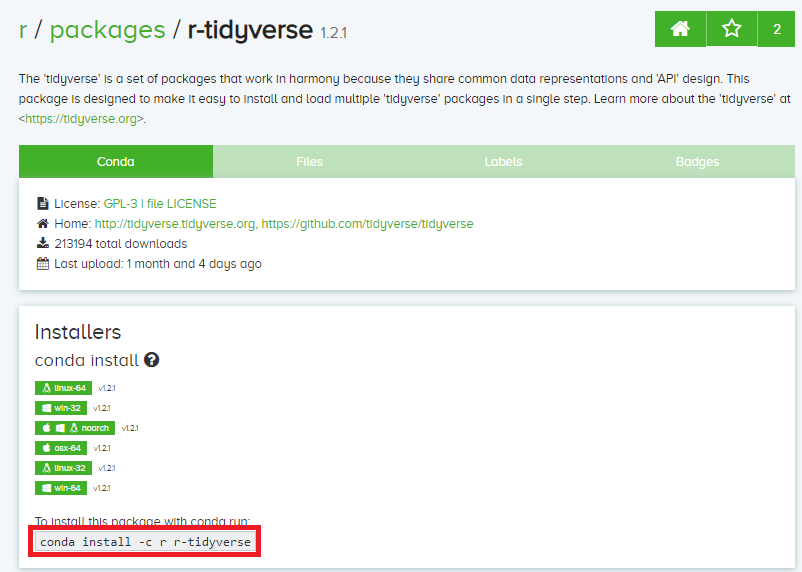
For instance, if the required library is Tidyverse, you can search for “conda install r tidyverse”. You can then navigate to the link with anaconda (most probably the first one, like here).
- Find the installation command from the anaconda link
The page should look something like this :

The command highlighted in red box is the command for installing the required package.
How to install the Conda complementary packages
- Activate the local R environment
you can find more about managing environments, by clicking here.
#conda activate <path to local env>

#or

#conda activate <name of the environment>
#example:
conda activate R
- Install the required package
Paste the installation command found on the Anaconda web page as described above. Enter
ywhen it prompts for confirmation.#example: conda install -c r r-tidyverse
A sample output is shown below:
[wz22@login1 ~]$ conda activate /home/wz22/.conda/envs/R
(R)[wz22@login1 ~]$ conda install -c r r-tidyverse
Collecting package metadata (repodata.json): done
Solving environment: done
Warning
It must be noted that the complementary packages must be installed only after activating the local R environment.
- Once the installation is done, launch R and check the installation of the package using the “library( )” function of R.
A sample output is shown below:
(R)[wz22@login1 ~]$ R

R version 3.6.1 (2019-07-05) -- "Action of the Toes"
Copyright (C) 2019 The R Foundation for Statistical Computing
Platform: x86_64-conda_cos6-linux-gnu (64-bit)

R is free software and comes with ABSOLUTELY NO WARRANTY.
You are welcome to redistribute it under certain conditions.
Type 'license()' or 'licence()' for distribution details.

 Natural language support but running in an English locale

R is a collaborative project with many contributors.
Type 'contributors()' for more information and
'citation()' on how to cite R or R packages in publications.

Type 'demo()' for some demos, 'help()' for on-line help, or
'help.start()' for an HTML browser interface to help.
Type 'q()' to quit R.

> library('tidyverse')
Registered S3 methods overwritten by 'ggplot2':
  method         from
  [.quosures     rlang
  c.quosures     rlang
  print.quosures rlang
Registered S3 method overwritten by 'rvest':
  method            from
  read_xml.response xml2
── Attaching packages ─────────────────────────────────────── tidyverse 1.2.1 ──
✔ ggplot2 3.1.1       ✔ purrr   0.3.2
✔ tibble  2.1.1       ✔ dplyr   0.8.0.1
✔ tidyr   0.8.3       ✔ stringr 1.4.0
✔ readr   1.3.1       ✔ forcats 0.4.0
── Conflicts ────────────────────────────────────────── tidyverse_conflicts() ──
✖ dplyr::filter() masks stats::filter()
✖ dplyr::lag()    masks stats::lag()
Submitting Job Scripts
The conda environment might not get activated when submitting a Job script since the slurm doesn’t source the bashrc file. Hence, in order to go about this, you can include the following line in your job submission script before activating the required environment.
source /share/apps/NYUAD5/miniconda/3-4.11.0/bin/activate
A sample job submission script is shown below:
#!/bin/bash
#SBATCH -n 10
#SBATCH -t 48:00:00
#Other SBATCH commands go here

#Activating conda
source /share/apps/NYUAD5/miniconda/3-4.11.0/bin/activate
conda activate R

#Your appication commands go here
Rscript abc.R
See also
Go through the Conda 30 mins test drive to make sure you understand the basic concepts: https://conda.io/projects/conda/en/latest/user-guide/tasks/manage-environments.html